Grails 数据库迁移
在此指南中,我们将学习如何使用 Grails 数据库迁移插件
作者: Nirav Assar、Sergio del Amo
Grails 版本 4.0.1
1 Grails 培训
Grails 培训 - 由创建且积极维护 Grails 框架的人员开发并提供!.
2 入门
在此指南中,您将学习如何使用 Grails 数据库迁移插件。我们将创建一个含有简单领域类的应用程序,并对其进行扩展以实现以下目的:
-
对数据库迁移进行数据库基准测试
-
将列更改为可为空
-
向现有表格添加列
-
重新设计表格并迁移现有数据
2.1 您需要了解的内容
要完成本指南,您需要了解以下内容:
-
留出一些时间亲自动手
-
一款像样的文本编辑器或 IDE
-
已安装 JDK 1.8 或更高版本,且相应地配置了
JAVA_HOME
2.2 如何完成指南
要开始,请执行以下操作:
-
下载并解压该源代码
或
Grails 指南存储库包含两个文件夹
-
initial初始项目。通常是一个简单的 Grails 应用程序,其中包含一些附加代码,可以帮助您快速入门。 -
已完成已完成的示例。这是按照指南呈现的步骤操作并且将这些更改应用到initial文件夹的结果。
若要完成该指南,请转到initial文件夹
-
将
cd转换为grails-guides/grails-database-migration/initial
并按照下一部分中的说明操作。
如果你将cd转换为grails-guides/grails-database-migration/complete,则可以直接转到已完成的示例 |
3 编写应用程序
我们要编写一个涉及 Person 类的简单应用程序。Person 类最初将拥有其自身属性,这些属性还包含地址信息。随着域的发展,我们将会将其属性分成其自身的 Address 域类。我们将使用 Grails Database Migration Plugin管理这些转换。
3.1 安装数据库
创建 MySQL 数据库
让我们使用 MySql 设置一个物理数据库,而不是依赖于内存数据库中的默认 H2。
-
转到 MySql 以安装数据库
-
创建
rootid 和root密码的管理员帐户 -
打开 MySql 命令行客户端
在命令行客户端中运行这些命令以创建并使用数据库。show tables 命令应返回一个空集。
设置 Grails 以使用 MySQL 数据库
> create database dbmigration character set utf8 collate utf8_general_ci;
> use dbmigration;
> show databases;
> show tables;
现在我们需要配置 Grails 应用程序以指向新的 dbmigration 数据库。我们将编辑 build.gradle 和 application.yml 文件。
dependencies {
...
    runtime 'mysql:mysql-connector-java:5.1.36'
...
}dataSource:
pooled: true
jmxExport: true
driverClassName: com.mysql.jdbc.Driver
dialect: org.hibernate.dialect.MySQL5InnoDBDialect
username: root
password: root
environments:
development:
dataSource:
dbCreate: none (1)
url: jdbc:mysql://:3306/dbmigration?useUnicode=yes&characterEncoding=UTF-8| 1 | dbCreate 定义我们是否希望根据域模型自动生成数据库。我们会将其设为 none,因为我们准备使用 Grails Database Migration Plugin 来管理数据库架构的管理。 |
3.2 域类
在适当的包中创建一个域类
package demo

import grails.compiler.GrailsCompileStatic

@GrailsCompileStatic
class Person {

    String name
    Integer age

}
3.3 安装数据库迁移插件
要安装 Grails 数据库迁移插件,我们需要添加到 build.gradle
buildscript {
   dependencies {
      ...
        classpath 'org.grails.plugins:database-migration:3.1.0.RC1'
   }
}

dependencies {
    ...
    compile 'org.grails.plugins:database-migration:3.1.0.RC1'
    compile 'org.liquibase:liquibase-core:3.6.1'
}
也要告诉 Gradle 有关迁移文件夹位置的信息。确保此配置早于 dependencies 配置,以使文件夹声明生效
sourceSets {
    main {
        resources {
            srcDir 'grails-app/migrations'
        }
    }
}
查看 Grails 数据库迁移插件 文档。
3.4 数据库迁移付诸实践
数据库迁移是对数据库执行架构变动,同时保留现有数据。如果没有管理数据库迁移的工具,团队可能依赖于手动 SQL、极易出错的通信流程以及昂贵的风险管理,来实施解决方案。使用此数据库迁移插件,你可以管理对数据库进行的结构化更改。它可以自动执行渐进式更改,使其可重复、不可见和可跟踪。你可以将这些更改提交到源代码管理中。
使用该插件所涉及的一般工作流程如下
基准
-
定义域的当前状态
-
使用 liquibase 从更改日志创建数据库
-
在应用程序中设置配置选项,以使用数据库迁移插件
开发工作流
-
修改域对象
-
使用插件为数据库生成更改日志附加项
-
使用插件更新数据库
3.5 数据库迁移基准
不再使用 GORM 架构自动生成,不过将使用 Grails Database Migration 插件所使用的数据库迁移工具 Liquibase 更改数据库架构。
我们要在启动时运行迁移,而迁移将位于 changelog.groovy 中
...
grails:
    plugin:
        databasemigration:
            updateOnStart: true
            updateOnStartFileName: changelog.groovy
...
该插件带有若干命令,其中一个命令 dbm-generate-gorm-changelog 会使用当前 GORM 类从 Groovy DSL 文件生成一个初始更改日志
> grails dbm-generate-gorm-changelog changelog.groovy这将生成一个类似于下面的更改日志
databaseChangeLog = {

    changeSet(author: "Nirav Assar (generated)", id: "1497549057046-1") {
        createTable(tableName: "person") {
            column(autoIncrement: "true", name: "id", type: "BIGINT") {
                constraints(primaryKey: "true", primaryKeyName: "personPK")
            }

            column(name: "version", type: "BIGINT") {
                constraints(nullable: "false")
            }

            column(name: "age", type: "INT") {
                constraints(nullable: "false")
            }

            column(name: "name", type: "VARCHAR(255)") {
                constraints(nullable: "false")
            }
        }
    }
}
您可能会看到 INFO 日志语句。它没有出错
INFO 7/24/17 11:29 AM: liquibase: Can not use class org.grails.plugins.databasemigration.liquibase.GormDatabase as a
Liquibase service because it does not have a no-argument constructor
将初始更改日志移动到其自身文件,并从主更改日志文件引用它。
$ cp grails-app/migrations/changelog.groovy grails-app/migrations/create-person-table.groovy将 changelog.groovy 中的内容替换为
databaseChangeLog = {
    include file: 'create-person-table.groovy'
}
应用迁移
$ grails dbm-update创建数据库表
> show tables;dbmigration 中的表 |
DATABASECHANGELOG |
DATABASECHANGELOGLOCK |
person |
Database Migration 插件使用表为 DATABASECHANGELOG 和 DATABASECHANGELOGLOCK,以追踪数据库迁移。
person 表对应 Person 域类。
> describe person;字段 |
类型 |
空值 |
键 |
默认值 |
额外 |
id |
bigint(20) |
否 |
主 |
<null> |
自动增加 |
version |
bigint(20) |
否 |
<null> |
||
age |
int(11) |
否 |
<null> |
||
name |
varchar(255) |
否 |
<null> |
3.6 将列设为可空
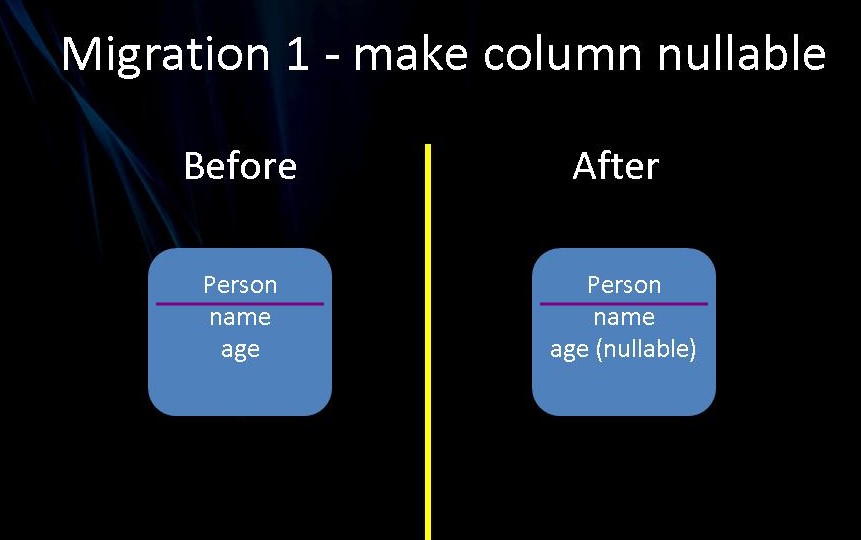
在本部分中,我们将做一个简单更改,将一列设为可空。age 列目前需要一个值。我们使其可空,然后继续迁移数据库以反映它。

在 Person 域对象中,使 age 属性可空
package demo

import grails.compiler.GrailsCompileStatic

@GrailsCompileStatic
class Person {

    String name
    Integer age

    static constraints = {
        age nullable: true
    }

}
请注意,在域对象中进行更改并不会影响数据库。我们必须生成对 changelog.groovy 的附加项,才能使更改生效。运行以下命令
> grails dbm-gorm-diff change-age-constraint-to-nullable.groovy --add为 changelog.groovy 添加了一个新的 include 语句
databaseChangeLog = {
    include file: 'create-person-table.groovy'
    include file: 'change-age-constraint-to-nullable.groovy'
}
也创建了一个单独的更改集
databaseChangeLog = {

    changeSet(author: "Nirav Assar (generated)", id: "1497551594095-1") {
        dropNotNullConstraint(columnDataType: "int", columnName: "age", tableName: "person")
    }
}
如果我们运行迁移
$ grails dbm-updateperson 表中 age 列在约束中表示为可空的
字段 |
类型 |
空值 |
键 |
默认值 |
额外 |
id |
bigint(20) |
否 |
主 |
<null> |
自动增加 |
version |
bigint(20) |
否 |
<null> |
||
age |
int(11) |
是 |
<null> |
||
name |
varchar(255) |
否 |
<null> |
3.7 添加属性
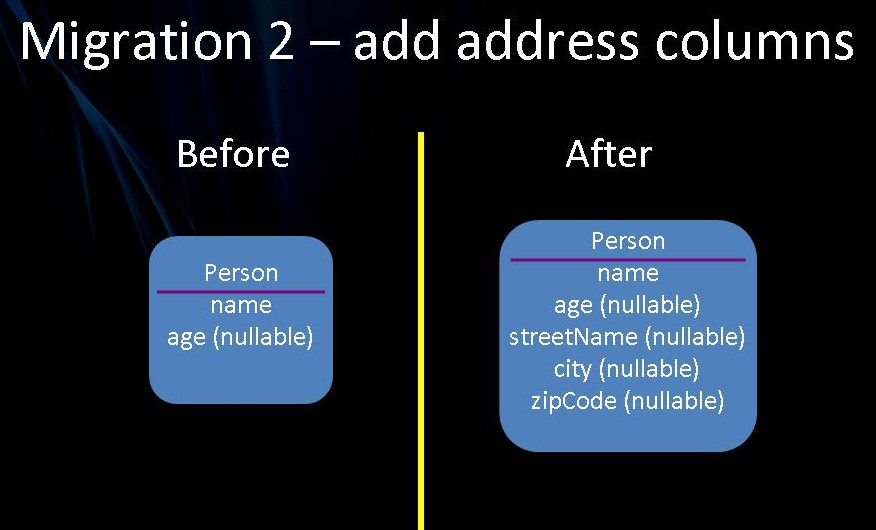
我们将为 Person 类添加一些地址属性,以演示我们的第二个迁移。

package demo

import grails.compiler.GrailsCompileStatic

@GrailsCompileStatic
class Person {

    String name
    Integer age
    String streetName
    String city
    String zipCode

    static constraints = {
        age nullable: true
        streetName nullable: true
        city nullable: true
        zipCode nullable: true
    }


}
如果我们对这些更改生成一个更改集
> grails dbm-gorm-diff add-address-fields-to-person.groovy --add该命令将一条新的 include 语句添加到 changelog.groovy
databaseChangeLog = {
    include file: 'create-person-table.groovy'
    include file: 'change-age-constraint-to-nullable.groovy'
    include file: 'add-address-fields-to-person.groovy'
}
也创建了一个单独的更改集
databaseChangeLog = {

    changeSet(author: "Nirav Assar (generated)", id: "1497552798178-1") {
        addColumn(tableName: "person") {
            column(name: "city", type: "varchar(255)")
        }
    }

    changeSet(author: "Nirav Assar (generated)", id: "1497552798178-2") {
        addColumn(tableName: "person") {
            column(name: "street_name", type: "varchar(255)")
        }
    }

    changeSet(author: "Nirav Assar (generated)", id: "1497552798178-3") {
        addColumn(tableName: "person") {
            column(name: "zip_code", type: "varchar(255)")
        }
    }
}
如果我们运行迁移
$ grails dbm-update在 person 表中创建新列 streetName、city、zipCode;
$ describe person字段 |
类型 |
空值 |
键 |
默认值 |
额外 |
id |
bigint(20) |
否 |
主 |
<null> |
自动增加 |
version |
bigint(20) |
否 |
<null> |
||
age |
int(11) |
是 |
<null> |
||
name |
varchar(255) |
否 |
<null> |
||
市区 |
varchar(255) |
是 |
<null> |
||
街道名称 |
varchar(255) |
是 |
<null> |
||
邮政编码 |
varchar(255) |
是 |
<null> |
3.8 重新设计表
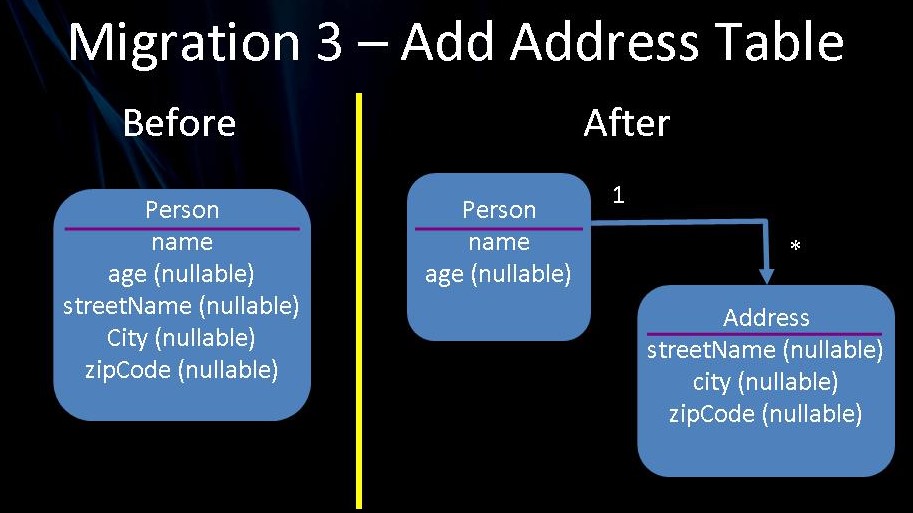
假如我们要重新设计 Person 将地址字段拆分为自己的域对象。这背后的想法是 Person 现在可以有多个 Address。在执行此类域对象重新设计时,我们必须考虑一些方面
-
数据库表模式定义将发生更改
-
表中的现有数据必须拆分到创建的新数据库表中
-
可以在变更日志文件中编写自定义 sql,以传输现有数据
下图描述了重新设计

可以如下编码 Person 和 Address 域对象
package demo

import grails.compiler.GrailsCompileStatic

@GrailsCompileStatic
class Person {

    String name
    Integer age
    static hasMany = [addresses: Address]

    static constraints = {
        age nullable: true
    }


}package demo
import grails.compiler.GrailsCompileStatic
@GrailsCompileStatic
class Address {
Person person
String streetName
String city
String zipCode
static belongsTo = [person: Person]
static constraints = {
streetName nullable: true
city nullable: true
zipCode nullable: true
}
}运行数据库迁移命令,该命令将新域对象与现有数据库进行比较,并生成迁移模式的 liquibase 声明
> grails dbm-gorm-diff create-address-table.groovy –add该命令将一条新的 include 语句添加到 changelog.groovy
databaseChangeLog = {
    include file: 'create-person-table.groovy'
    include file: 'change-age-constraint-to-nullable.groovy'
    include file: 'add-address-fields-to-person.groovy'
    include file: 'create-address-table.groovy'
}
也创建了一个单独的更改集
    changeSet(author: "Nirav Assar (generated)", id: "1497553930799-1") {
        createTable(tableName: "address") {
            column(autoIncrement: "true", name: "id", type: "BIGINT") {
                constraints(primaryKey: "true", primaryKeyName: "addressPK")
            }

            column(name: "version", type: "BIGINT") {
                constraints(nullable: "false")
            }

            column(name: "city", type: "VARCHAR(255)")

            column(name: "person_id", type: "BIGINT") {
                constraints(nullable: "false")
            }

            column(name: "street_name", type: "VARCHAR(255)")

            column(name: "zip_code", type: "VARCHAR(255)")
        }
    }
    changeSet(author: "Nirav Assar (generated)", id: "1497553930799-2") {
        addForeignKeyConstraint(baseColumnNames: "person_id", baseTableName: "address", constraintName: "FK81ihijcn1kdfwffke0c0sjqeb", deferrable: "false", initiallyDeferred: "false", referencedColumnNames: "id", referencedTableName: "person")
    }
    changeSet(author: "Nirav Assar (generated)", id: "1497553930799-3") {
        dropColumn(columnName: "city", tableName: "person")
    }

    changeSet(author: "Nirav Assar (generated)", id: "1497553930799-4") {
        dropColumn(columnName: "street_name", tableName: "person")
    }

    changeSet(author: "Nirav Assar (generated)", id: "1497553930799-5") {
        dropColumn(columnName: "zip_code", tableName: "person")
    }
我们将手动添加一个变更集,将现有数据从旧表移至新表。
create-address-table.groovy 的最终版本如下所示
    changeSet(author: "Nirav Assar (generated)", id: "1497553930799-1") {
        createTable(tableName: "address") {
            column(autoIncrement: "true", name: "id", type: "BIGINT") {
                constraints(primaryKey: "true", primaryKeyName: "addressPK")
            }

            column(name: "version", type: "BIGINT") {
                constraints(nullable: "false")
            }

            column(name: "city", type: "VARCHAR(255)")

            column(name: "person_id", type: "BIGINT") {
                constraints(nullable: "false")
            }

            column(name: "street_name", type: "VARCHAR(255)")

            column(name: "zip_code", type: "VARCHAR(255)")
        }
    }
    changeSet(author: "Nirav Assar (generated)", id: "1497553930799-2") {
        addForeignKeyConstraint(baseColumnNames: "person_id", baseTableName: "address", constraintName: "FK81ihijcn1kdfwffke0c0sjqeb", deferrable: "false", initiallyDeferred: "false", referencedColumnNames: "id", referencedTableName: "person")
    }
    (1)
    changeSet(author: "a488338 (generated)", id: "migrate-person-data") {
        sql("""insert into address (version, person_id, street_name, city, zip_code)
              select 0, id, street_name, city, zip_code from person""")
    }
    changeSet(author: "Nirav Assar (generated)", id: "1497553930799-3") {
        dropColumn(columnName: "city", tableName: "person")
    }

    changeSet(author: "Nirav Assar (generated)", id: "1497553930799-4") {
        dropColumn(columnName: "street_name", tableName: "person")
    }

    changeSet(author: "Nirav Assar (generated)", id: "1497553930799-5") {
        dropColumn(columnName: "zip_code", tableName: "person")
}| 1 | 我们添加的变更集在创建 Address 表之后但在从 Person 表删除列之前执行。 |
运行迁移
$ grails dbm-updateperson 表如下所示
$ describe person字段 |
类型 |
空值 |
键 |
默认值 |
额外 |
id |
bigint(20) |
否 |
主 |
<null> |
自动增加 |
version |
bigint(20) |
否 |
<null> |
||
age |
int(11) |
是 |
<null> |
||
name |
varchar(255) |
否 |
<null> |
address 表如下所示
$ describe address字段 |
类型 |
空值 |
键 |
默认值 |
额外 |
id |
bigint(20) |
否 |
主 |
<null> |
自动增加 |
version |
bigint(20) |
否 |
<null> |
||
person_id |
bigint(20) |
否 |
MUL |
<null> |
|
市区 |
varchar(255) |
是 |
<null> |
||
街道名称 |
varchar(255) |
是 |
<null> |
||
邮政编码 |
varchar(255) |
是 |
<null> |
4 摘要
本指南总结一下,我们学习了如何使用数据库迁移插件来更改列名、添加列以及在迁移现有数据的同时重新设计表。请注意,数据库迁移由一个典型的工作流组成
-
对域对象进行更改。
-
生成变更日志,它将识别现有数据库和已编辑域对象之间的数据库结构差异。
-
考虑要迁移的任何现有数据。
-
执行数据库迁移脚本。
