单一数据库多租户 - 辨别器列
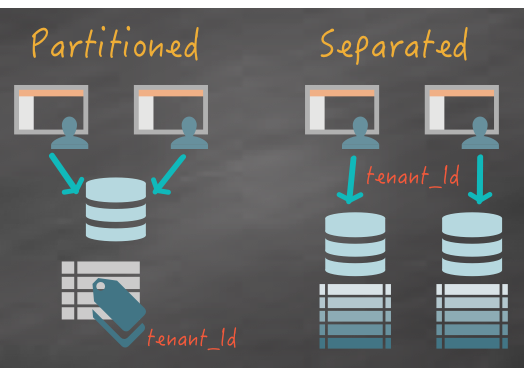
了解如何利用 GORM 的多租户功能来构建一个使用单一数据库但使用辨别器列对其数据进行分区的应用程序。
作者:Sergio del Amo
Grails 版本 4.0.1
1 Grails 培训
Grails 培训 - 由创建并积极维护 Grails 框架的人员开发和交付!。
2 开始使用
在此指南中,您将使用 Grails 和 GORM 构建一个使用辨别器列对其数据进行分区的多租户应用程序。
使用辨别器列允许您使用相同的数据库,用唯一的租户标识符处理不同的租户(用户)。
2.1 所需内容
要完成此指南,您需要具备以下内容
-
一些时间
-
一个不错的文本编辑器或 IDE
-
已安装 JDK 1.8 或更高版本,并已正确配置了
JAVA_HOME
2.2 如何完成指南
要开始操作,请执行以下操作
-
下载并解压源代码
或
-
克隆 Git 存储库
git clone https://github.com/grails-guides/discriminator-per-tenant.git
Grails 指南存储库包含两个文件夹
-
initial初始项目。通常是一个带有额外代码的简单 Grails 应用程序,可为您提供先人一步的优势。 -
complete已完成示例。这是指导中展示的步骤,以及将这些步骤应用于initial文件夹的结果。
要完成指引,请转到 initial 文件夹
-
cd至grails-guides/discriminator-per-tenant/initial
然后按照后续部分中的说明进行操作。
如果您 cd 至 grails-guides/discriminator-per-tenant/complete,则您可以直接转到已完成示例 |
3 编写应用程序
3.1 设置多租户
3.1.1 多租户模式
为了使用多租户,您需要设置 GORM 使用的多租户模式,因为支持三种不同的模式
-
DATABASE - 每个租户使用一个不同的数据库连接
-
SCHEMA - 使用一个数据库,但每个租户使用不同的物理架构
-
DISCRIMINATOR - 使用一个数据库,但使用鉴别符列来分割数据
通常,DATABASE 和 SCHEMA 模式都可以视为是物理上分离的,而 DISCRIMINATOR 模式需要更谨慎,因为不同租户的数据存储在同一个物理数据库中

在这种情况下,所需的多租户模式是 DISCRIMINATOR,它可以通过 grails.gorm.multiTenancy.mode 设置来配置
grails:
    gorm:
        multiTenancy:
            mode: DISCRIMINATOR
            tenantResolverClass: org.grails.datastore.mapping.multitenancy.web.SessionTenantResolver
3.1.2 TenantResolver
请注意,除了模式以外,上面的示例还配置了 tenantResolverClass,用于解析租户。
tenantResolverClass 是一个类,用于实现 TenantResolver 接口。
GORM 中包含多个内置的 TenantResolver 实现,包括
| 类型 | 说明 |
|---|---|
使用名为 |
|
使用名为 |
|
从当前子域中解析租户 id。例如,如果子域为 |
|
从名为 |
这些实现开箱即用非常有用,但是 GORM 很灵活,您可以通过实现 TenantResolver 接口来实现自己的策略。
例如,如果您使用的是 Spring Security,您可以编写一个 TenantResolver,用于从当前登录用户解析租户 id。 |
本示例我们将会使用SessionTenantResolver并且在当前用户会话中储存租户 ID。
3.2 创建域类
在创建应用程序的域类时,通常情况下既有适用于多租户的域类又有不适用的域类。
对于将不会使用多租户的域类,只需按照常规定义即可。
在此示例中,Manufacturer将成为租户 ID 的提供者。将使用Manufacturer的名称作为租户标识符。
package example

import grails.compiler.GrailsCompileStatic

@GrailsCompileStatic
class Manufacturer {
    String name

    static constraints = {
        name blank: false
    }
}
下一步是定义只能由给定租户访问的域类
package example

import grails.gorm.MultiTenant

class Engine implements MultiTenant<Engine> { (1)
    Integer cylinders
    String manufacturer  (2)

    static constraints = {
        cylinders nullable: false
    }

    static mapping = {
        tenantId name:'manufacturer'  (2)
    }
}package example
import grails.gorm.MultiTenant
class Vehicle implements MultiTenant<Vehicle> { (1)
String model
Integer year
String manufacturer (2)
static hasMany = [engines: Engine]
static constraints = {
model blank:false
year min:1980
}
static mapping = {
tenantId name:'manufacturer' (2)
}
}| 1 | 两个域类都实现了MultiTenant trait |
| 2 | manufacturer属性用作租户 ID 区分器列。 |
Vehicle和Engine域类都实现了MultiTenant trait。GORM 使用租户标识符区分器列,根据已配置的TenantResolver返回的结果租户 ID 解析要从中使用的实体。
3.3 设置测试数据
为了设置一些测试数据,可以修改Application类来实现ApplicationRunner接口,以便在启动时运行事务逻辑
package example

import grails.boot.GrailsApp
import grails.boot.config.GrailsAutoConfiguration
import org.springframework.boot.ApplicationArguments
import org.springframework.boot.ApplicationRunner
import grails.gorm.transactions.Transactional
import groovy.transform.CompileStatic

@CompileStatic
class Application extends GrailsAutoConfiguration implements ApplicationRunner { (1)

    static void main(String[] args) {
        GrailsApp.run(Application, args)
    }

    @Override
    @Transactional
    void run(ApplicationArguments args) throws Exception { (2)
        Manufacturer.saveAll( (3)
            new Manufacturer(name: 'Audi'),
            new Manufacturer(name: 'Ford')
        )
    }
}| 1 | 实现ApplicationRunner接口 |
| 2 | 使用@Transactional将run方法标记为事务 |
| 3 | 使用saveAll保存两个Manufacturer实例 |
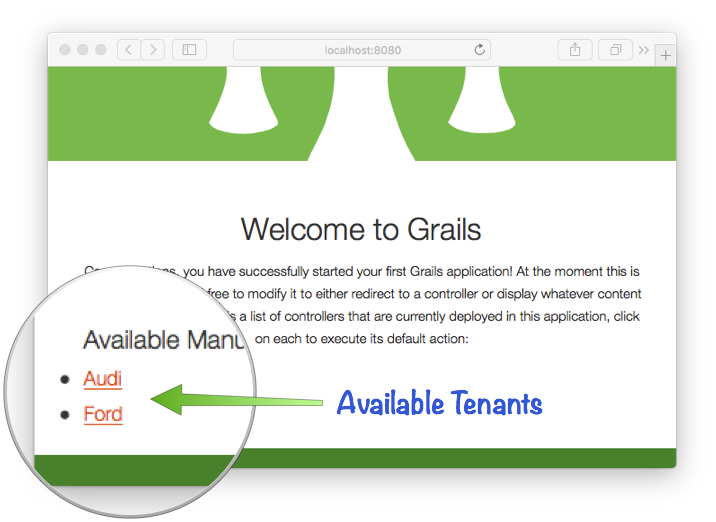
在此示例中保存了大约两个Manufacturer实例,它们将对应于此应用程序支持的两个租户。
3.4 实施租户选择
在应用程序中支持多租户的第一步是实现某种形式的租户选择。可以通过 DNS 子域来解析租户,或者如果你使用 Spring Security 进行身份验证,则它可以作为应用程序注册过程的一部分。
为了使示例简单化,我们将实现一个简单的机制,提供一个 UI 来将tenantId存储在用户的 HTTP 会话中。
首先,创建一个 GORM 数据服务到Manufacturer
Unresolved directive in <stdin> - include::/home/runner/work/discriminator-per-tenant/discriminator-per-tenant/complete/grails-app/init/example/ManufacturerService.groovy[]然后,创建一个新的ManufacturerController,使用create-controller或你偏好的 IDE
$ grails create-controller Manufacturer接下来修改UrlMappings.groovy文件,将应用程序的根映射到index操作
'/'(controller: 'manufacturer')然后定义一个index操作,其中列出所有制造商并呈现grails-app/views/index.gsp视图。
package example

import org.grails.datastore.mapping.multitenancy.web.SessionTenantResolver
import grails.gorm.transactions.ReadOnly
import groovy.transform.CompileStatic

@CompileStatic
class ManufacturerController {
    @ReadOnly
    def index() {
        render view: '/index', model: [manufacturers: manufacturerService.findAll()]
    }
}
在 grails-app/views/index.gsp 文件中,简单地迭代遍历每个结果并创建一个到 select 操作的链接
<div id="controllers" role="navigation">
    <h2>Available Manufacturers:</h2>
    <ul>
        <g:each var="m" in="${manufacturers}">
            <li class="controller">
                <g:link controller="manufacturer" action="select" id="${m.name}">${m.name}</g:link>
            </li>
        </g:each>
    </ul>
</div>
select 操作选择当前租户,并在当前用户的 HTTP 会话中存储该租户
@ReadOnly
def select(String id) {
    Manufacturer m = manufacturerService.findByName(id) (1)
    if ( m ) {
        session.setAttribute(SessionTenantResolver.ATTRIBUTE, m.name.toLowerCase()) (2)
        redirect controller: 'vehicle' (3)
    }
    else {
        render status: 404
    }
}| 1 | 获取由提供的 id 标识的制造商 |
| 2 | 已选择的租户存储在会话属性中。 |
select 操作将查找一个 Manufacturer,并将 Manufacturer 的名称(小写)作为当前租户存储在 HTTP 会话中。
这导致 SessionTenantResolver 从 HTTP 会话中解析正确的租户 ID。
最后,为改进错误处理,您可以将 TenantNotFoundException 的所有出现映射回制造商列表
'500' (controller: 'manufacturer', exception: TenantNotFoundException)有了这些更改,您便可以从主页中选择每个租户

现在,既然可以选择租户,让我们创建一个能够使用当前活动租户的逻辑。
3.5 编写多租户感知数据逻辑
GORM 提供了一组 多租户转换,这些转换有助于解析租户并在方法的范围内绑定用于该特定租户的 Hibernate 会话。
| 类型 | 说明 |
|---|---|
解析当前租户,并在方法的范围内绑定一个 Hibernate 会话 |
|
解析特定租户,并在方法的范围内绑定一个 Hibernate 会话 |
|
在没有租户的情况下在方法中执行一些逻辑 |
这些转换通常应应用于 Grails 应用程序中的服务,当与 GORM 6.1 中引入的 GORM 数据服务 概念相结合时,它们的效果非常好。
为实现用于保存和检索 Vehicle 实例的逻辑,创建一个新的
grails-app/services/example/VehicleService.groovy 文件,并在 CurrentTenant 和 Service 注解中用注释对其进行批注
import grails.gorm.multitenancy.CurrentTenant
import grails.gorm.services.Service
import grails.gorm.transactions.Transactional
import groovy.transform.CompileStatic

@Service(Vehicle) (1)
@CurrentTenant (2)
@CompileStatic
abstract class VehicleService {
}| 1 | Service 转换将确保由 GORM 实现的任何抽象方法都得到实现 |
| 2 | CurrentTenant 转换将确保在服务上执行的任何方法都首先解析当前租户并绑定一个 Hibernate 会话。 |
该类是 abstract,因为很多方法都会由 GORM 为您实现。 |
现在让我们了解如何在多租户应用程序中实现查询逻辑。
3.5.1 执行多租户感知查询
为在 GORM 数据服务中实现多租户查询,只需添加与 GORM 中支持的惯例之一 相对应的抽象方法即可
abstract List<Vehicle> list(Map args ) (1)

abstract Integer count() (2)

abstract Vehicle find(Serializable id) (3)| 1 | list 方法返回一个 Vehicle 实例列表,并采用映射作为可选参数以执行分页 |
| 2 | count 方法统计 Vehicle 实例的数量 |
| 3 | find 方法按 id 查找单个 Vehicle |
现在是时候编写一个控制器,以使用这些新定义的方法了。首先,使用 create-controller 命令或您首选的 IDE,创建一个新的 grails-app/controllers/example/VehicleController.groovy 类。
VehicleController 应定义一个引用先前创建的 VehicleService 的属性
import static org.springframework.http.HttpStatus.NOT_FOUND
import grails.gorm.multitenancy.CurrentTenant
import grails.validation.ValidationException
import groovy.transform.CompileStatic

@CompileStatic
class VehicleController  {

    static allowedMethods = [save: 'POST', update: 'PUT', delete: 'DELETE']

    VehicleService vehicleService
    ...
}
现在运行 grails generate-views 以生成一些默认的 GSP 视图,它们可以呈现 Vehicle 实例
$ grails generate-views example.Vehicle接下来在 UrlMappings.groovy 文件中添加一个条目以映射 /vehicles URI
'/vehicles'(resources: 'vehicle')现在,您已准备好添加查询逻辑来为每个租户读取 Vehicle 实例。使用以下读操作更新 VehicleController
def index(Integer max) {
    params.max = Math.min(max ?: 10, 100)
    respond vehicleService.list(params), model: [vehicleCount: vehicleService.count()]
}

def show(Long id) {
    Vehicle vehicle = id ? vehicleService.find(id) : null
    respond vehicle
}
find 和 show 操作都使用 VehicleService 来定位 Vehicle 实例。VehicleService 将确保为每个租户解析正确的租户并返回正确的数据。
3.5.2 执行多租户更新
若要添加用于执行写操作的逻辑,您可以简单地修改 VehicleService 并为 save 和 delete 添加新的抽象方法
abstract Vehicle save(String model,
                        Integer year)

abstract Vehicle delete(Serializable id)
上述 save 和 delete 方法将自动帮您实现。
GORM 数据服务非常智能,会为每个方法添加适当的事务语义(例如,对读操作采用 readOnly)。但是,您可以通过自己添加 @Transactional 注解来覆盖事务语义。 |
若要实现更新,您可以添加一个新方法,它将调用现有的抽象 find 方法
@Transactional
Vehicle update( Serializable id, (5)
                String model,
                Integer year) {
    Vehicle vehicle = find(id)
    if (vehicle != null) {
        vehicle.model = model
        vehicle.year = year
        vehicle.save(failOnError:true)
    }
    vehicle
}
这演示了 GORM 数据服务的一个重要概念:您可以轻松地将您定义的方法与 GORM 自动帮您实现的方法混合在一起。
调用 VehicleService 并公开这些写操作的相应控制器操作也很简单
def save(String model, Integer year) {
    try {
        Vehicle vehicle = vehicleService.save(model, year)
        flash.message = 'Vehicle created'
        redirect vehicle
    } catch (ValidationException e) {
        respond e.errors, view: 'create'
    }
}

def update(Long id, String model, Integer year) {
    try {
        Vehicle vehicle = vehicleService.update(id, model, year)
        if (vehicle == null) {
            notFound()
        } else if ( vehicle.hasErrors() ) {
            redirect action: 'edit', params: [id: id]
        }
        else {
            flash.message = 'Vehicle updated'
            redirect vehicle
        }
    } catch (ValidationException e) {
        respond e.errors, view: 'edit'
    }
}

protected void notFound() {
    flash.message = 'Vehicle not found'
    redirect uri: '/vehicles', status: NOT_FOUND
}

def delete(Long id) {
    Vehicle vehicle = vehicleService.delete(id)
    if (vehicle == null) {
        notFound()
    }
    else {
        flash.message = 'Vehicle Deleted'
        redirect action: 'index', method: 'GET'
    }
}
4 多租户单元测试
测试使用多租户的控制器逻辑需要特殊考虑。
幸运的是,GORM 6.1 使得编写单元测试变得相对简单。
若要为 VehicleController 类编写一个单元测试,请创建一个新的
src/test/groovy/example/VehicleControllerSpec.groovy Spock 规范
class VehicleControllerSpec extends HibernateSpec implements ControllerUnitTest<VehicleController> {
        ...
}
如您在上面看到的,此测试扩展了 HibernateSpec。
若要使测试变得更简单,请通过覆盖 HibernateSpec 的 getConfiguration() 方法来覆盖 tenantResolverClass
@Override
Map getConfiguration() {
    super.getConfiguration() + [(Settings.SETTING_MULTI_TENANT_RESOLVER_CLASS): SystemPropertyTenantResolver]
}
这将允许您使用 SystemPropertyTenantResolver 在测试内更改租户 ID。
下一步是提供一个 setup 方法,该方法为控制器配置 VehicleService
VehicleService vehicleService (1)

def setup() {
    System.setProperty(SystemPropertyTenantResolver.PROPERTY_NAME, 'audi') (2)
    vehicleService = hibernateDatastore.getService(VehicleService) (3)
    controller.vehicleService = vehicleService (4)
}| 1 | 将 vehicleService 定义为单元测试的属性 |
| 2 | 为测试设置租户 ID 为 audi |
| 3 | 从 GORM 中查找 VehicleService 实现 |
| 4 | 将 VehicleService 分配给受测试的控制器 |
为了确保正确清理,你还应该在 cleanup 方法中清除租户 ID
def cleanupSpec() {
    System.setProperty(SystemPropertyTenantResolver.PROPERTY_NAME, '')
}
完成上述操作后,测试控制器逻辑就变得很简单,例如测试不含数据的 index 操作
void 'Test the index action returns the correct model'() {

    when: 'The index action is executed'
    controller.index()

    then: 'The model is correct'
    !model.vehicleList
    model.vehicleCount == 0
}
你还可以编写测试来测试不存在租户 ID 的情况,方法就是清除租户 ID
void 'Test the index action with no tenant id'() {
    when: 'there is no tenant id'
    System.setProperty(SystemPropertyTenantResolver.PROPERTY_NAME, '')
    controller.index()

    then:
    thrown(TenantNotFoundException)
}
也可以测试保存数据等更复杂的交互过程
    void 'Test the save action correctly persists an instance'() {

        when: 'The save action is executed with an invalid instance'
        request.contentType = FORM_CONTENT_TYPE
        request.method = 'POST'
        controller.save('', 1900)

        then: 'The create view is rendered again with the correct model'
        model.vehicle != null
        view == 'create'

        when: 'The save action is executed with a valid instance'
        controller.save('A5', 2011)

        then: 'A redirect is issued to the show action'
        controller.flash.message != null
        vehicleService.count() == 1
        response.redirectedUrl == '/vehicles/1'

        when: 'The show action is executed with a null domain'
        controller.show(null)

        then: 'A 404 error is returned'
        response.status == 404

        when: 'Update is called for a domain instance that doesn\'t exist'
        response.reset()
        request.contentType = FORM_CONTENT_TYPE
        request.method = 'PUT'
        controller.update(999, 'A5', 2011)

        then: 'A 404 error is returned'
        response.redirectedUrl == '/vehicles'
        flash.message != null

        when: 'An invalid domain instance is passed to the update action'
        response.reset()
        controller.update(1, 'A5', 1900)

        then: 'The edit view is rendered again with the invalid instance'
        view == 'edit'
        model.vehicle instanceof Vehicle

        when: 'A valid domain instance is passed to the update action'
        response.reset()
        controller.update(1, 'A5', 2012)

        then: 'A redirect is issued to the show action'
        response.redirectedUrl == '/vehicles/1'
        flash.message != null

        when: 'The delete action is called for a null instance'
        response.reset()
        request.contentType = FORM_CONTENT_TYPE
        request.method = 'DELETE'
        controller.delete(null)

        then: 'A 404 is returned'
        response.redirectedUrl == '/vehicles'
        flash.message != null
        vehicleService.count() == 1

        when: 'A domain instance is created'
        response.reset()
        controller.delete(1)

        then: 'The instance is deleted'
        vehicleService.count() == 0
        response.redirectedUrl == '/vehicles'
        flash.message != null
    }
}
请注意,在上述测试的断言中,我们使用 vehicleService,这可确保在断言时使用正确的租户。
5 个功能测试
我们在 Geb 页面中映射 CRUD 页面
package example

import geb.Page

class ManufacturersPage extends Page {

    static at = { $('h2').text().contains('Available Manufacturers') }

    static content = {
        audiLink { $('a', text: 'Audi') }
        fordLink { $('a', text: 'Ford') }
    }

    void selectAudi() {
        audiLink.click()
    }

    void selectFord() {
        fordLink.click()
    }
}package example
import geb.Page
class NewVehiclePage extends Page {
static at = { title.contains('Create Vehicle') }
static content = {
inputModel { $('input', name: 'model') }
inputYear { $('input', name: 'year') }
createButton { $('input', name: 'create') }
}
void newVehicle(String model, int year) {
inputModel << model
inputYear = year
createButton.click()
}
}package example
import geb.Page
class ShowVehiclePage extends Page {
static at = { title.contains('Show Vehicle') }
static content = {
listButton { $('a', text: 'Vehicle List') }
}
void vehicleList() {
listButton.click()
}
}package example
import geb.Page
class VehiclesPage extends Page {
static at = { title.contains('Vehicle List') }
static content = {
newVehicleLink { $('a', text: 'New Vehicle') }
vehiclesRows { $('tbody tr') }
}
void newVehicle() {
newVehicleLink.click()
}
int numberOfVehicles() {
vehiclesRows.size()
}
}我们在功能测试中测试租户选择
package example

import geb.spock.GebSpec
import grails.testing.mixin.integration.Integration

@Integration
class TenantSelectionFuncSpec extends GebSpec {

    def "it is possible to change tenants and get different lists of vehicles"() {

        when:
        go '/'

        then:
        at ManufacturersPage

        when:
        ManufacturersPage page = browser.page(ManufacturersPage)
        page.selectAudi()

        then:
        at VehiclesPage

        when:
        VehiclesPage vehiclesPage = browser.page(VehiclesPage)
        vehiclesPage.newVehicle()

        then:
        at NewVehiclePage

        when:
        NewVehiclePage newVehiclePage = browser.page(NewVehiclePage)
        newVehiclePage.newVehicle('A5', 2000)

        then:
        at ShowVehiclePage

        when:
        ShowVehiclePage showVehiclePage = browser.page(ShowVehiclePage)
        showVehiclePage.vehicleList()

        then:
        at VehiclesPage

        when:
        vehiclesPage = browser.page(VehiclesPage)

        then:
        vehiclesPage.numberOfVehicles() == 1

        when:
        vehiclesPage.newVehicle()

        then:
        at NewVehiclePage

        when:
        newVehiclePage = browser.page(NewVehiclePage)
        newVehiclePage.newVehicle('A3', 2001)

        then:
        at ShowVehiclePage

        when:
        showVehiclePage = browser.page(ShowVehiclePage)
        showVehiclePage.vehicleList()

        then:
        at VehiclesPage

        when:
        vehiclesPage = browser.page(VehiclesPage)

        then:
        vehiclesPage.numberOfVehicles() == 2

        when:
        go '/'

        then:
        at ManufacturersPage

        when:
        ManufacturersPage manufacturersPage = browser.page(ManufacturersPage)
        manufacturersPage.selectFord()

        then:
        at VehiclesPage

        when:
        vehiclesPage = browser.page(VehiclesPage)
        vehiclesPage.newVehicle()

        then:
        at NewVehiclePage

        when:
        newVehiclePage = browser.page(NewVehiclePage)
        newVehiclePage.newVehicle('KA', 1996)

        then:
        at ShowVehiclePage

        when:
        showVehiclePage = browser.page(ShowVehiclePage)
        showVehiclePage.vehicleList()

        then:
        at VehiclesPage

        when:
        vehiclesPage = browser.page(VehiclesPage)

        then:
        vehiclesPage.numberOfVehicles() == 1
    }

}
6 运行此应用程序
要运行此应用程序,请使用 ./gradlew bootRun 命令,这将在端口 8080 上启动此应用程序。
现在执行以下步骤
-
导航至主页并选择“奥迪”
-
为
Vehicle输入数据以创建一个新的Vehicle -
请注意,数据将创建为
vehicle表中的鉴别器列manufacturer的audi值。
然后,如果你返回主页并选择“福特”,当前租户将切换。网页应用程序将显示租户 ford 的数据。鉴别器列有效地将数据隔离在两个租户之间。
