构建基于 Grails 后端工具的 Swift iOS 客户端
本指南说明了如何将 Grails 作为使用 Swift 构建的 iOS 应用程序的后端工具
作者:Sergio del Amo
Grails 版本 3.3.0
1 Grails 培训
Grails 培训 - 由创建并活跃维护 Grails 框架的人员开发和实施!。
2 开始使用
在本指南中,您将构建一个 Grails 应用程序,它将作为公司内部网后端工具。它公开一个 JSON 公告 API。
此外,您将构建一个 iOS 应用程序,作为内部网客户端,它消耗后端工具提供的 JSON API。
本指南探讨对不同 API 版本的支持。
2.1 您需要什么
若要完成本指南,您将需要以下内容
-
手头有点时间
-
一个像样的文本编辑器或 IDE
-
JDK 1.7 或更高版本已安装,且适当配置了
JAVA_HOME -
最新稳定版本的 Xcode。本指南是使用 Xcode 8.2.1 编写的
2.2 如何完成指南
若要完成此指南,你需要从 Github 查看源码,并按照指南中提供的步骤进行操作。
要开始,请执行以下操作
-
下载并解压源代码,或者如果你已经安装了 Git:
git clone https://github.com/grails-guides/building-an-ios-swift-client-powered-by-a-grails-backend.git
按照 Grails 部分
-
cd到grails-guides/building-an-ios-swift-client-powered-by-a-grails-backend/initial
或者,如果你已经安装了 Grails,则可以使用终端窗口中的以下命令创建一个新应用程序
$ grails create-app intranet.backend.grails-app --profile rest-api
$ cd grails-app
create-app 命令完成后,Grails 将使用 profile=rest-api 参数创建一个用于创建 REST 应用程序(因为使用了参数 profile=rest-api )且配置为使用带 H2 数据库的 Hibernate 功能的 grails-app 目录。
如果你 cd 到 grails-guides/building-an-ios-swift-client-powered-by-a-grails-backend/complete,则可以直接转到完成的 Grails 示例 |
按照 iOS 部分
-
cd到grails-guides/building-an-ios-swift-client-powered-by-a-grails-backend/initial-swift-ios -
继续进入下一节
或者,你可以使用 Xcode Studio 的新建向导创建 iOS 应用程序,如下一个屏幕截图所示。
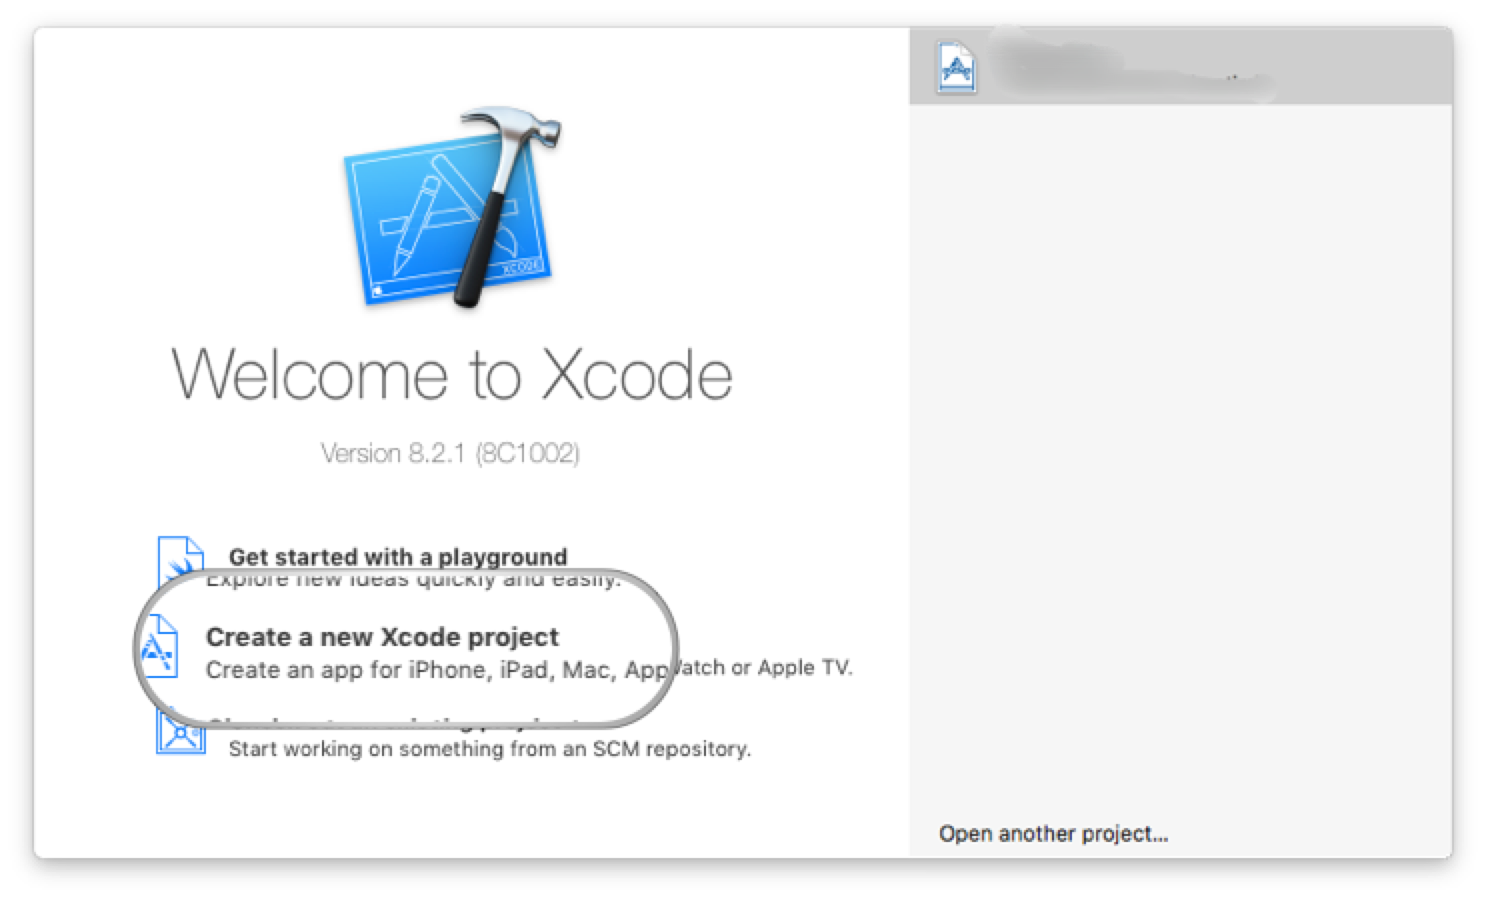
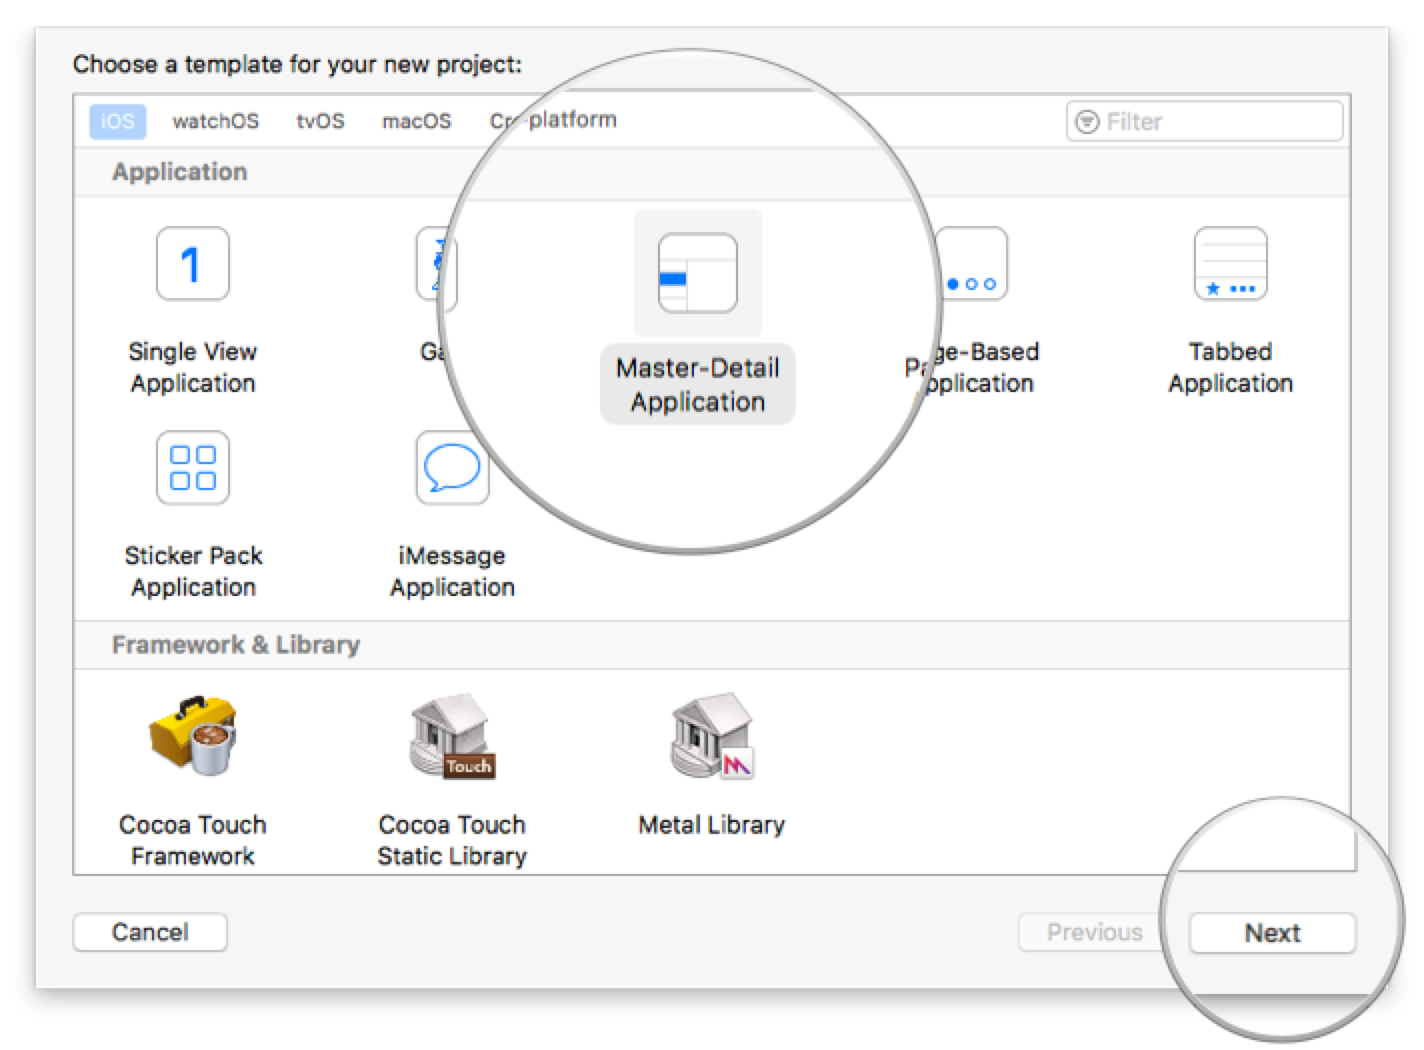
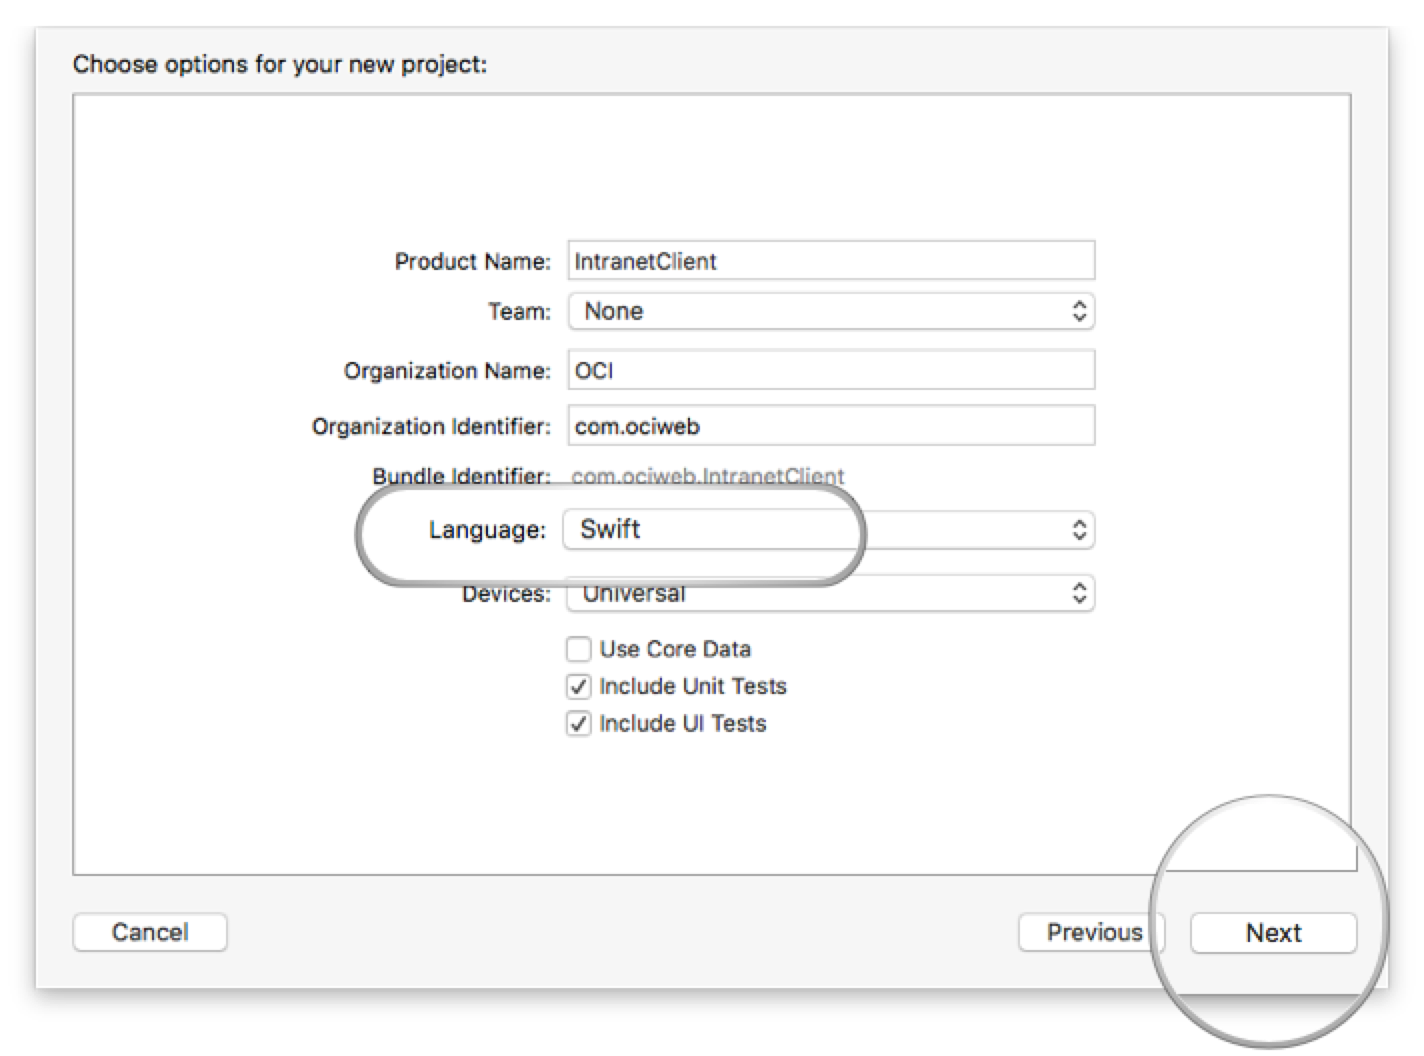
如果你 cd 到 grails-guides/building-an-ios-swift-client-powered-by-a-grails-backend/complete-swift-ios-v1,则可以直接转到完成的 iOS 示例版本 1 |
如果你 cd 到 grails-guides/building-an-ios-swift-client-powered-by-a-grails-backend/complete-swift-ios-v2,则可以直接转到完成的 iOS 示例版本 2 |
3 概述
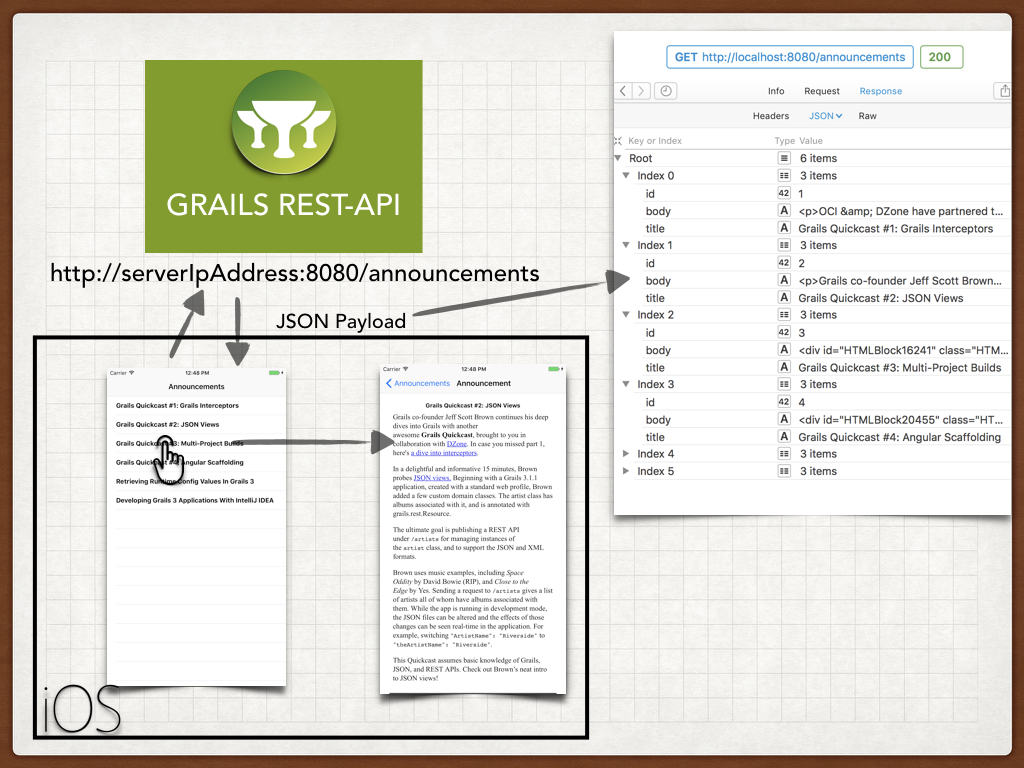
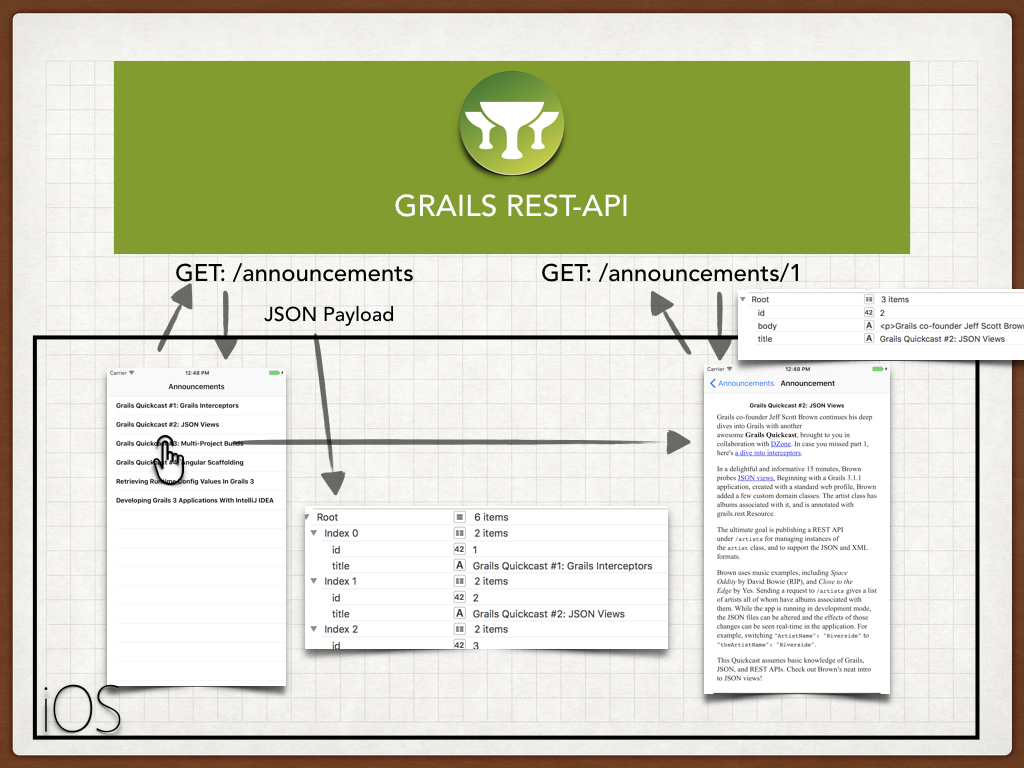
下图说明了 iOS 应用程序版本 1 的行为。iOS 应用程序由两个视图控制器组成。
-
当 iOS 应用程序初始屏幕加载时,它会请求公告列表。
-
Grails 应用程序发送包含公告列表的 JSON 有效负载。对于每个公告,都包括一个唯一标识符、一个标题和一个 HTML 正文。
-
iOS 应用程序在 UITableView 中呈现 JSON 有效负载
-
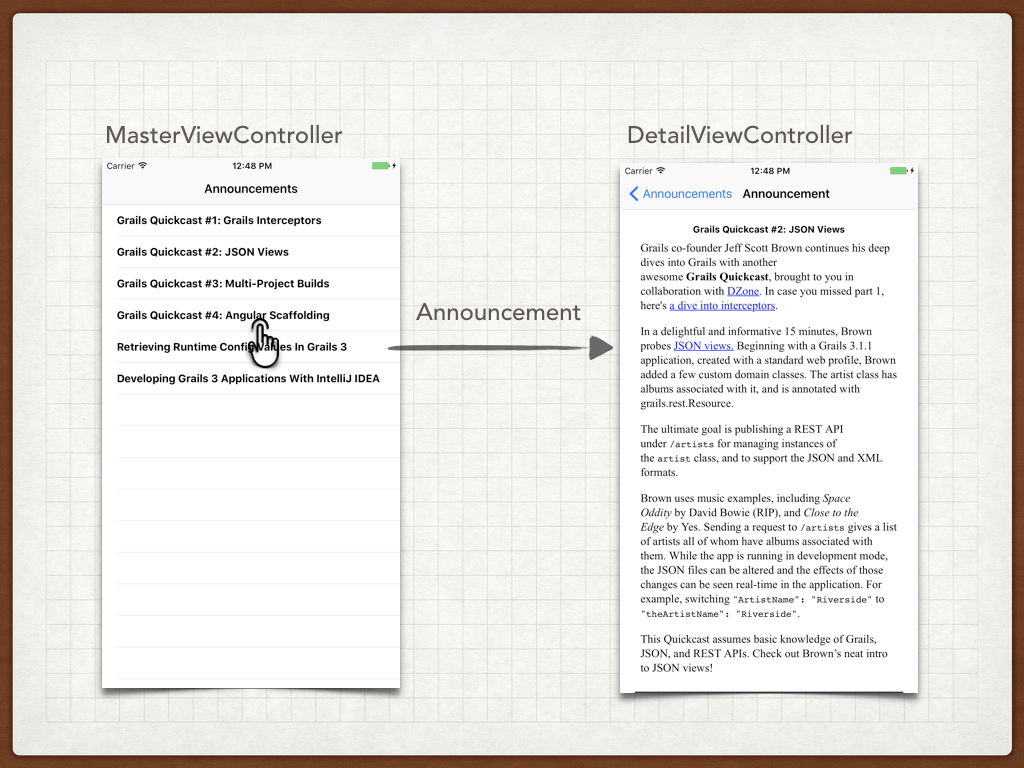
用户轻触公告标题,应用程序转到详情屏幕。初始屏幕向详情屏幕发送公告标识符、标题和 HTML 正文。后者将在 UIWebView 中呈现
4 编写 Grails 应用程序
现在,你可以开始编写 Grails 应用程序了。
4.1 创建领域类 - 持久化实体
我们需要创建持久化实体来存储公司公告。Grails 使用 Grails 领域类 来处理持久化
领域类满足模型视图控制器 (MVC) 模式中的 M,代表映射到基础数据库表的持久化实体。在 Grails 中,领域位于 grails-app/domain 目录中的类。
Grails 使用 create-domain-class 命令 简化了领域类的创建。
 ./grailsw create-domain-class Announcement
| Resolving Dependencies. Please wait...
CONFIGURE SUCCESSFUL
Total time: 4.53 secs
| Created grails-app/grails/company/intranet/Announcement.groovy
| Created src/test/groovy/grails/company/intranet/AnnouncementSpec.groovy
为了简化起见,我们假设公司公告只包含一个 title 和一个 HTML body。我们准备修改在上一步生成内容领域类以存储该信息。
package intranet.backend

class Announcement {

    String title
    String body

    static constraints = {
        title size: 0..255
        body nullable: true
    }

    static mapping = {
        body type: 'text'  (1)
    }
}| 1 | 它使我们能够在 body 中存储超过 255 个字符的字符串。 |
4.2 领域类单元测试
Grails 使测试变得更加容易,从低级别单元测试到高级功能测试。
我们要在约束属性中测试在 Announcement 域类中定义的约束。尤其是 title 和 body 属性的可空性和长度。
package intranet.backend

import grails.testing.gorm.DomainUnitTest
import spock.lang.Specification

class AnnouncementSpec extends Specification implements DomainUnitTest<Announcement> {

    void "test body can be null"() {
        expect:
        new Announcement(body: null).validate(['body'])
    }

    void "test title can not be null"() {
        expect:
        !new Announcement(title: null).validate(['title'])
    }

    void "test body can have a more than 255 characters"() {

        when: 'for a string of 256 characters'
        String str = ''
        256.times { str += 'a' }

        then: 'body validation passes'
        new Announcement(body: str).validate(['body'])
    }

    void "test title can have a maximum of 255 characters"() {

        when: 'for a string of 256 characters'
        String str = ''
        256.times { str += 'a' }

        then: 'title validation fails'
        !new Announcement(title: str).validate(['title'])

        when: 'for a string of 256 characters'
        str = ''
        255.times { str += 'a' }

        then: 'title validation passes'
        new Announcement(title: str).validate(['title'])
    }
}
我们可以使用 test_app 命令运行每个测试,包括我们刚刚创建的测试。
 ./grailsw test-app
 | Resolving Dependencies. Please wait...
 CONFIGURE SUCCESSFUL
 Total time: 2.534 secs
 :complete:compileJava UP-TO-DATE
 :complete:compileGroovy
 :complete:buildProperties
 :complete:processResources
 :complete:classes
 :complete:compileTestJava UP-TO-DATE
 :complete:compileTestGroovy
 :complete:processTestResources UP-TO-DATE
 :complete:testClasses
 :complete:test
 :complete:compileIntegrationTestJava UP-TO-DATE
 :complete:compileIntegrationTestGroovy UP-TO-DATE
 :complete:processIntegrationTestResources UP-TO-DATE
 :complete:integrationTestClasses UP-TO-DATE
 :complete:integrationTest UP-TO-DATE
 :complete:mergeTestReports

 BUILD SUCCESSFUL

 | Tests PASSED
4.3 版本化
从一开始考虑 API 版本化非常重要,尤其是当您创建手机应用程序使用的 API 时。用户将运行不同版本的应用,您需要对 API 进行版本化以创建高级功能,但仍然支持旧版本。
Grails 允许多种方法进行 REST 资源版本化。
-
使用 URI
-
使用 Accept-Version 头
-
使用超媒体/MIME 类型
在本指南中,我们将使用 Accept-Version 头来对 API 进行版本化。
运行版本 1.0 的设备将在 Accept Version HTTP 头中传递 1.0,从而调用 announcements enpoint。
$ curl -i -H "Accept-Version: 1.0" -X GET https://:8080/announcements运行版本 2.0 的设备将在 Accept Version 头中传递 2.0,从而调用 announcements enpoint。
$ curl -i -H "Accept-Version: 2.0" -X GET https://:8080/announcements4.4 创建控制器
我们为之前创建的 领域类 创建一个 控制器。我们的控制器扩展 RestfulController。这将为我们提供 RESTful 功能,以便使用不同的 HTTP 方法列出、创建、更新和删除 Announcement 资源。
package intranet.backend.v1

import grails.rest.RestfulController
import intranet.backend.Announcement

class AnnouncementController extends RestfulController<Announcement> {
    static namespace = 'v1' (1)
    static responseFormats = ['json'] (2)

    AnnouncementController() {
        super(Announcement)
    }
}| 1 | 此控制器将处理我们的 API 的 v1 版本 |
| 2 | 我们希望仅响应 JSON 负载 |
Url 映射
我们希望我们的终结点侦听 /announcements,而不是 /announcement。此外,我们希望之前为其声明命名空间 v1 的控制器来处理将 Accept-Version HTTP 头设置为 1.0 的请求。
Grails 启用强大的 URL 映射 配置来执行此操作。在映射闭包中添加下一行
get "/announcements"(version:'1.0', controller: 'announcement', namespace:'v1')4.5 加载测试数据
当应用程序启动时,我们将用多个公告填充数据库。
为此,我们编辑 grails-app/init/grails/company/intranet/BootStrap.groovy。
package grails.company.intranet

class BootStrap {

    def init = { servletContext ->
        announcements().each { it.save() }
    }
    def destroy = {
    }

    static List<Announcement> announcements() {
        [
                new Announcement(title: 'Grails Quickcast #1: Grails Interceptors'),
                new Announcement(title: 'Grails Quickcast #2: JSON Views')
        ]
    }
}为保证代码示例简洁,前一个代码摘要中的公告不包含正文内容。查看 grails-app/init/intranet/backend/BootStrap.groovy 了解完整代码。 |
4.6 功能测试
功能测试涉及向正在运行的应用程序发出 HTTP 请求,并验证由此产生的行为。
我们使用 Rest Client Builder Grails 插件,在使用 rest-api 配置文件创建应用程序时会添加对其的依赖关系。
/home/runner/work/building-an-ios-swift-client-powered-by-a-grails-backend/building-an-ios-swift-client-powered-by-a-grails-backend/complete
package intranet.backend

import grails.plugins.rest.client.RestBuilder
import grails.testing.mixin.integration.Integration
import org.springframework.beans.factory.annotation.Value
import spock.lang.Specification
import javax.servlet.http.HttpServletResponse


@Integration
class AnnouncementControllerSpec extends Specification {

    def "test body is present in announcements json payload of Api 1.0"() {
        given:
        RestBuilder rest = new RestBuilder()

        when: 'Requesting announcements for version 1.0'
        def resp = rest.get("https://:${serverPort}/announcements/") { (1)
            header("Accept-Version", "1.0") (2)
        }

        then: 'the request was successful'
        resp.status == HttpServletResponse.SC_OK (3)

        and: 'the response is a JSON Payload'
        resp.headers.get('Content-Type') == ['application/json;charset=UTF-8']

        and: 'json payload contains an array of annoucements with id, title and body'
        resp.json.each {
            assert it.id
            assert it.title
            assert it.body (4)
        }
    }

    def "test body is NOT present in announcements json payload of Api 2.0"() {
        given:
RestBuilder rest = new RestBuilder()| 1 | serverPort 属性会自动注入。其中包含在功能测试期间 Grails 应用程序运行的随机端口 |
| 2 | 将 API 版本作为 Http 标头传递 |
| 3 | 验证响应代码为 200;正常 |
| 4 | 正文存在于 JSON payload 中 |
Grails 命令 test-app 运行单元、集成和功能测试。
4.7 运行应用程序
要运行应用程序,请使用 ./gradlew bootRun 命令,该命令将在端口 8080 上启动应用程序。
5 编写 iOS 应用程序
5.1 获取公告
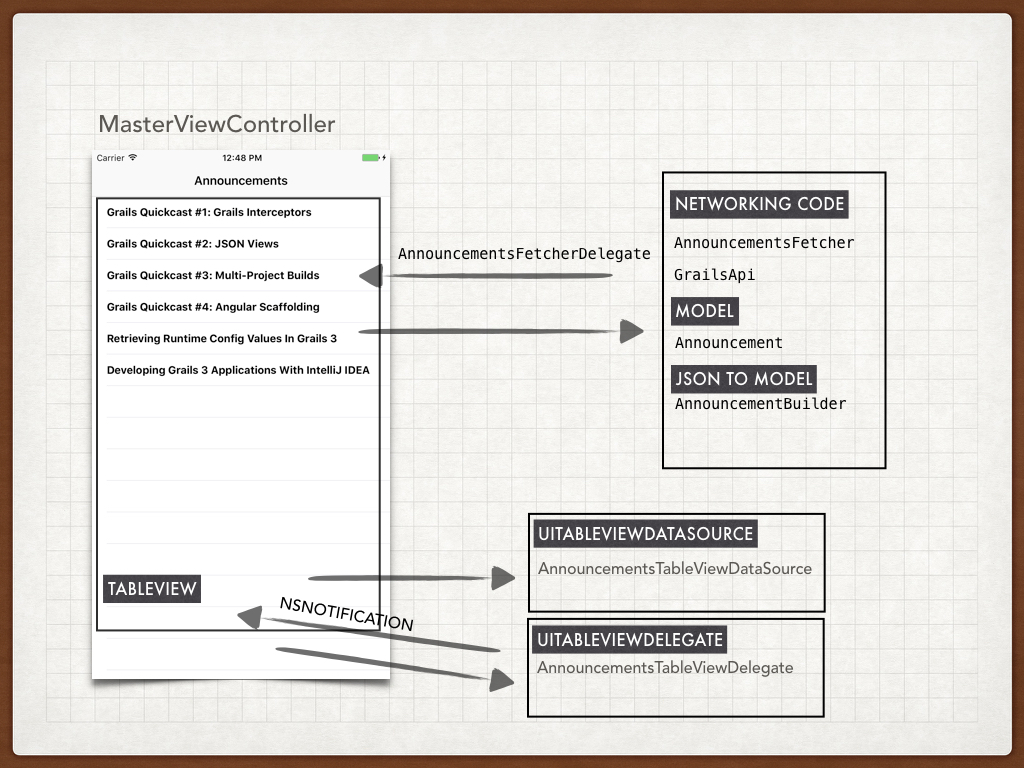
下一张图片说明了参与 Grails 应用程序公开的公告获取和呈现的类。
5.2 模型
服务器发送的公告将会呈现到一个对象中
class Announcement {
    let primaryKey: Int
    let title: String
    var body: String?

    init(primaryKey: Int, title: String) {
        self.primaryKey = primaryKey
        self.title = title
    }
}
5.3 Json 到模型
为了根据数据(例如网络请求)构建模型对象,我们使用一个构建器类
import Foundation

class AnnouncementBuilder {

    func announcementsFromJSON(_ data: Data?) -> [Announcement] {
        let json = try? JSONSerialization.jsonObject(with: data!, options: [])
        var announcements = [Announcement]()
        if let array = json as? [Any] {
            for object in array {
                if let dict = object as? Dictionary<String, AnyObject> {
                    if let title = dict["title"] as? String, let primaryKey = dict["id"]  as? Int {
                        let announcement = Announcement(primaryKey: primaryKey, title: title)
                        if let body = dict["body"]  as? String {
                            announcement.body = body
                        }
                        announcements.append(announcement)
                    }
                }
            }
        }
        return announcements
    }
}
5.4 网络代码
我们使用 NSURLSession 连接到 Grails API。几个常量设置在 GrailsFetcher 中
struct GrailsApi {
    static let serverUrl = "http://192.168.1.40:8080" (1)
    struct Announcements {
        static let Path = "announcements" (2)
    }
    static let version = "1.0" (3)
}| 1 | Grails 应用程序服务器 URL。 |
| 2 | 在 UrlMappings.groovy 中的 Grails 应用程序中配置的路径 |
| 3 | API 的版本 |
| 可能需要更改 IP 地址以匹配本地计算机。 |
import Foundation

class AnnouncementsFetcher : NSObject, URLSessionDelegate {

    weak var delegate:AnnouncementsFetcherDelegate?
    let builder = AnnouncementBuilder()

    func fetchAnnouncements() {
        let url = URL(string: "\(GrailsApi.serverUrl)/\(GrailsApi.Announcements.Path)")!
        let req = NSMutableURLRequest(url:url)
        req.setValue(GrailsApi.version, forHTTPHeaderField: "Accept-Version") (1)
        let config = URLSessionConfiguration.default
        let session = URLSession(configuration: config, delegate: self, delegateQueue: OperationQueue.main)

        let task = session.dataTask(with: req as URLRequest) { (data, response, error) in
            if error != nil {
                if let delegate = self.delegate {
                    delegate.announcementsFetchingFailed()
                }
                return
            }
            let announcements = self.builder.announcementsFromJSON(data)
            if let delegate = self.delegate {
                delegate.announcementsFetched(announcements)
            }

        }
        task.resume()

    }
}| 1 | 我们为每个请求设置 Accept-Version Http 标头。 |
一旦我们获取公告列表,我们将响应告知实施委托的类
protocol AnnouncementsFetcherDelegate: class {

    func announcementsFetchingFailed()

    func announcementsFetched(_ announcements: [Announcement])
}
MasterViewController 实施 fetcher 委托协议,因此它可以接收公告
import UIKit

class MasterViewController: UITableViewController, AnnouncementsFetcherDelegate {

    var detailViewController: DetailViewController? = nil
    var objects = [Any]()

    var tableViewDataSource = AnnouncementsTableViewDataSource()
    var tableViewDelegate = AnnouncementsTableViewDelegate()
    let fetcher = AnnouncementsFetcher()

    // MARK: - LifeCycle

    override func viewDidLoad() {
        super.viewDidLoad()
        self.tableView.dataSource = self.tableViewDataSource
        self.tableView.delegate = self.tableViewDelegate
        self.fetcher.delegate = self
    }

    override func viewWillAppear(_ animated: Bool) {
        self.clearsSelectionOnViewWillAppear = self.splitViewController!.isCollapsed
        super.viewWillAppear(animated)
        self.registerNotifications()
        self.fetchAnnouncements() (1)
    }

    override func viewWillDisappear(_ animated: Bool) {
        super.viewWillDisappear(animated)
        self.unregisterNotifications()
    }

    // MARK: - Notifications

    func registerNotifications() {
        NotificationCenter.default.addObserver(
            self,
            selector: #selector(self.announcementTapped),
            name: Notification.Name("AnnouncementTappedNotification"),
            object: nil)
    }

    func unregisterNotifications() {
        NotificationCenter.default.removeObserver(
            self,
            name: Notification.Name("AnnouncementTappedNotification"),
            object: nil)
    }

    // MARK: - Private Methods

    @objc func announcementTapped(notification: NSNotification){

        let announcement = notification.object as! Announcement
        self.performSegue(withIdentifier: "showDetail", sender: announcement)
    }

    func fetchAnnouncements() {
        self.setNetworkActivityIndicator(true)
        self.fetcher.fetchAnnouncements()
    }

    func setNetworkActivityIndicator(_ visible: Bool) {
        UIApplication.shared.isNetworkActivityIndicatorVisible = visible
    }

    // MARK: - Segues

    override func prepare(for segue: UIStoryboardSegue, sender: Any?) {
        if segue.identifier == "showDetail" {
            let controller = (segue.destination as! UINavigationController).topViewController as! DetailViewController
            if let announcement = sender as? Announcement {
                controller.announcement = announcement
            }
            controller.navigationItem.leftBarButtonItem = self.splitViewController?.displayModeButtonItem
            controller.navigationItem.leftItemsSupplementBackButton = true
        }
    }

    // MARK: - AnnouncementsFetcherDelegate

    func announcementsFetchingFailed() {
        self.setNetworkActivityIndicator(false)
    }

    func announcementsFetched(_ announcements: [Announcement]) {  (2)
        self.setNetworkActivityIndicator(false)

        self.tableViewDataSource.announcements = announcements
        self.tableViewDelegate.announcements = announcements
        self.tableView.reloadData()
    }
}| 1 | 触发公告获取 |
| 2 | 一旦我们获取公告列表,便刷新 UI |
MasterViewController 将其 UITableView 的数据源和委托设置为下一个类
import UIKit

class AnnouncementsTableViewDataSource : NSObject, UITableViewDataSource {

    var announcements = [Announcement]()


    func tableView(_ tableView: UITableView, numberOfRowsInSection section: Int) -> Int {
        return announcements.count
    }

    func tableView(_ tableView: UITableView, cellForRowAt indexPath: IndexPath) -> UITableViewCell {

        let cell = tableView.dequeueReusableCell(withIdentifier: "Cell", for: indexPath)

        let announcement = announcements[indexPath.row]
        cell.textLabel!.text = announcement.title
        return cell
    }
}import UIKit
class AnnouncementsTableViewDelegate : NSObject, UITableViewDelegate {
var announcements = [Announcement]()
func tableView(_ tableView: UITableView, didSelectRowAt indexPath: IndexPath) {
let announcement = announcements[indexPath.row]
NotificationCenter.default.post(name: Notification.Name("AnnouncementTappedNotification"), object: announcement) (1)
}
}| 1 | 当用户轻触公告时,会发出一个通知。MasterViewController 捕获它并启动到 DetailViewController 的 segue |
5.5 详情视图控制器
当用户轻触公告时,将发布包含轻触公告的通知。在MasterViewController的prepareForSegue:sender方法中,我们设置DetailViewController的公告属性
    override func prepare(for segue: UIStoryboardSegue, sender: Any?) {
        if segue.identifier == "showDetail" {
            let controller = (segue.destination as! UINavigationController).topViewController as! DetailViewController
            if let announcement = sender as? Announcement {
                controller.announcement = announcement
            }
            controller.navigationItem.leftBarButtonItem = self.splitViewController?.displayModeButtonItem
            controller.navigationItem.leftItemsSupplementBackButton = true
        }
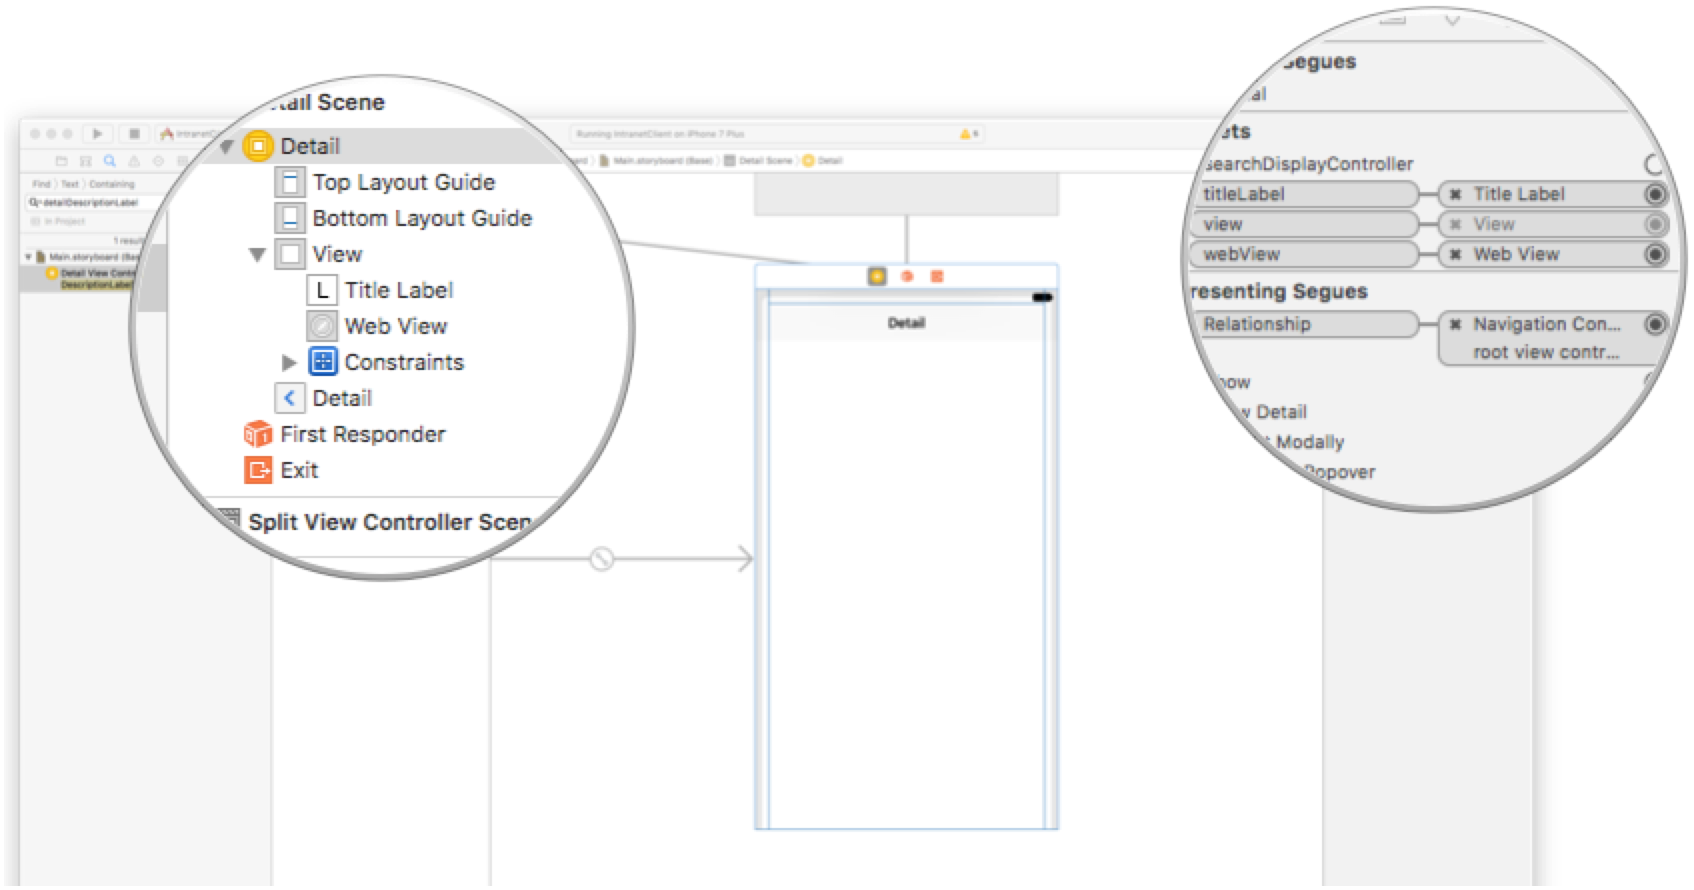
为了呈现公告,我们使用UILabel和UIWebView,如下所示,我们将其连接到故事情节画面的IBOutlets
这是完整的DetailViewController代码。其中不涉及网络代码。
import UIKit

class DetailViewController: UIViewController, UIWebViewDelegate {

    @IBOutlet weak var titleLabel: UILabel!
    @IBOutlet weak var webView: UIWebView!
    @IBOutlet weak var activityIndicatorView: UIActivityIndicatorView!

    func configureView() {
        // Update the user interface for the detail item.
        if let announcement = self.announcement {
            if let label = self.titleLabel {
                label.text = announcement.title
            }
            if let webView = self.webView, let body = announcement.body {
                self.hideActivityIndicator()
                webView.loadHTMLString(body, baseURL: nil)
            } else {
                self.hideActivityIndicator()
            }
        } else {
            self.hideActivityIndicator()
        }
    }

    func hideActivityIndicator() {
        if let activityIndicatorView  = self.activityIndicatorView {
            activityIndicatorView.stopAnimating()
        }
    }

    override func viewDidLoad() {
        super.viewDidLoad()
        // Do any additional setup after loading the view, typically from a nib.
        self.configureView()
    }

    var announcement: Announcement? {
        didSet {
            // Update the view.
            self.configureView()
        }
    }


    // MARK: - UIWebViewDelegate

    func webViewDidFinishLoad(_ webView: UIWebView) {
        self.hideActivityIndicator()
    }

    func webView(_ webView: UIWebView, didFailLoadWithError error: Error) {
        self.hideActivityIndicator()
    }
}
6 API 版本 2.0
API 的第一个版本存在问题:我们将每个公告正文包括在用于显示列表的有效负载中。公告正文可能是大块的 HTML。用户可能只想查看几个公告。如果我们在初始请求中不发送公告正文,这将节省带宽并使应用程序运行得更快。相反,在用户轻触公告后,我们将要求 API 提供完整的公告(包括正文)。
6.1 Grails V2 更改
我们将创建一个新的控制器来处理 API 的第 2 版。我们将使用带有投影的 Criteria 查询仅获取公告的 ID 和标题。
package intranet.backend.v2

import grails.rest.RestfulController
import intranet.backend.Announcement

class AnnouncementController extends RestfulController<Announcement> {
    static namespace = 'v2'
    static responseFormats = ['json']

    def announcementService

    AnnouncementController() {
        super(Announcement)
    }

    def index(Integer max) {
        params.max = Math.min(max ?: 10, 100)
        def announcements = announcementService.findAllIdAndTitleProjections(params)
        respond announcements, model: [("${resourceName}Count".toString()): countResources()]
    }
}
我们在服务中封装查询
package intranet.backend

import grails.transaction.Transactional

@Transactional(readOnly = true)
class AnnouncementService {

    List<Map> findAllIdAndTitleProjections(Map params) {
        def c = Announcement.createCriteria()
        def announcements = c.list(params) {
            projections {
                property('id')
                property('title')
            }
        }.collect { [id: it[0], title: it[1]] } as List<Map>
    }
}
并对其进行测试
package intranet.backend

import grails.test.hibernate.HibernateSpec
import grails.testing.services.ServiceUnitTest

class AnnouncementServiceSpec extends HibernateSpec implements ServiceUnitTest<AnnouncementService> {

    def "test criteria query with projection returns a list of maps"() {

        when: 'Save some announcements'
        [new Announcement(title: 'Grails Quickcast #1: Grails Interceptors'),
        new Announcement(title: 'Grails Quickcast #2: JSON Views'),
        new Announcement(title: 'Grails Quickcast #3: Multi-Project Builds'),
        new Announcement(title: 'Grails Quickcast #4: Angular Scaffolding'),
        new Announcement(title: 'Retrieving Runtime Config Values In Grails 3'),
        new Announcement(title: 'Developing Grails 3 Applications With IntelliJ IDEA')].each {
            it.save()
        }

        then: 'announcements are saved'
        Announcement.count() == 6

        when: 'fetching the projection'
        def resp = service.findAllIdAndTitleProjections([:])

        then: 'there are six maps in the response'
        resp
        resp.size() == 6

        and: 'the maps contain only id and title'
        resp.each {
            it.keySet() == ['title', 'id'] as Set<String>
         }

        and: 'non empty values'
        resp.each {
            assert it.title
            assert it.id
        }

    }
}
Url 映射
我们需要将 Accept-Header 的2.0版本映射到v2名称空间
        get "/announcements"(version:'2.0', controller: 'announcement', namespace:'v2')
        get "/announcements/$id(.$format)?"(version:'2.0', controller: 'announcement', action: 'show', namespace:'v2')
6.2 Api 2.0 功能测试
我们想要测试 Api 版本 2.0 在接收到对公告端点的 GET 请求时不包含正文属性。下一个功能测试将验证该行为。
/home/runner/work/building-an-ios-swift-client-powered-by-a-grails-backend/building-an-ios-swift-client-powered-by-a-grails-backend/complete
package intranet.backend

import grails.plugins.rest.client.RestBuilder
import grails.testing.mixin.integration.Integration
import org.springframework.beans.factory.annotation.Value
import spock.lang.Specification
import javax.servlet.http.HttpServletResponse


@Integration
class AnnouncementControllerSpec extends Specification {

    def "test body is present in announcements json payload of Api 1.0"() {
        given:
        RestBuilder rest = new RestBuilder()

        when: 'Requesting announcements for version 2.0'
        def resp = rest.get("https://:${serverPort}/announcements/") {
            header("Accept-Version", "2.0")
        }

        then: 'the request was successful'
        resp.status == HttpServletResponse.SC_OK

        and: 'the response is a JSON Payload'
        resp.headers.get('Content-Type') == ['application/json;charset=UTF-8']

        and: 'json payload contains an array of annoucements with id, title'
        resp.json.each {
            assert it.id
            assert it.title
            assert !it.body (2)
        }
    }

    def "test detail of an announcement contains body in both version 1.0 and 2.0"() {
given:| 1 | serverPort 属性会自动注入。其中包含在功能测试期间 Grails 应用程序运行的随机端口 |
| 2 | 正文不存在 JSON 有效负载中 |
Grails 命令 test-app 运行单元、集成和功能测试。
6.3 iOS V2 更改
首先,我们需要更改GrailsFetcher.h中定义的 Api 版本常量
struct GrailsApi {
    static let serverUrl = "http://192.168.1.40:8080"
    static let version = "2.0" (1)
    struct Announcements {
        static let Path = "announcements"
    }
}| 1 | 使用 Api 版本 2.0 |
在版本 2.0 中,Api 不会返回公告的正文。我们不会设置公告属性,而是仅在DetailViewController中设置资源标识符(主键)。我们已更改MasterViewController中的prepareForSegue:sender方法,如下所示
    override func prepare(for segue: UIStoryboardSegue, sender: Any?) {
        if segue.identifier == "showDetail" {
            let controller = (segue.destination as! UINavigationController).topViewController as! DetailViewController
            if let announcement = sender as? Announcement {
                controller.announcementPrimaryKey = announcement.primaryKey
            }
            controller.navigationItem.leftBarButtonItem = self.splitViewController?.displayModeButtonItem
            controller.navigationItem.leftItemsSupplementBackButton = true
        }
}| 1 | 我们设置整数,而不是设置对象 |
DetailViewController要求服务器提供完整的公告;包括正文。
import UIKit

class DetailViewController: UIViewController, UIWebViewDelegate, AnnouncementFetcherDelegate {

    @IBOutlet weak var titleLabel: UILabel!
    @IBOutlet weak var webView: UIWebView!
    @IBOutlet weak var activityIndicatorView: UIActivityIndicatorView!

    let fetcher = AnnouncementFetcher()

    // MARK: - LifeCycle

    override func viewDidLoad() {
        super.viewDidLoad()
        self.fetcher.delegate = self
        self.configureView()
    }

    func configureView() {
        // Update the user interface for the detail item.
        if let announcement = self.announcement {
            if let label = self.titleLabel {
                label.text = announcement.title
            }
            if let webView = self.webView, let body = announcement.body {
                self.hideActivityIndicator()
                webView.loadHTMLString(body, baseURL: nil)
            } else {
                self.hideActivityIndicator()
            }
        }
    }

    var announcement: Announcement? {
        didSet {
            self.configureView()
        }
    }

    var announcementPrimaryKey: Int? {
        didSet {
            self.showActivityIndicator()
            self.fetcher.fetchAnnouncement(self.announcementPrimaryKey!)
        }
    }

    // MARK: - Private Methods
    func showActivityIndicator() {
        if let activityIndicatorView  = self.activityIndicatorView {
            activityIndicatorView.startAnimating()
        }
    }

    func hideActivityIndicator() {
        if let activityIndicatorView  = self.activityIndicatorView {
            activityIndicatorView.stopAnimating()
        }
    }


    // MARK: - UIWebViewDelegate

    func webViewDidFinishLoad(_ webView: UIWebView) {
        self.hideActivityIndicator()
    }

    func webView(_ webView: UIWebView, didFailLoadWithError error: Error) {
        self.hideActivityIndicator()
    }

    // Mark: - AnnouncementFetcherDelegate

    func announcementFetchingFailed() {

    }

    func announcementFetched(_ announcement: Announcement) {
        self.announcement = announcement
    }
}
它使用新的取词器
import Foundation

class AnnouncementFetcher : NSObject, URLSessionDelegate {

    weak var delegate: AnnouncementFetcherDelegate?
    let builder = AnnouncementBuilder()

    func fetchAnnouncement(_ primaryKey: Int) {
        let url = URL(string: "\(GrailsApi.serverUrl)/\(GrailsApi.Announcements.Path)/\(primaryKey)")!
        let req = NSMutableURLRequest(url:url)
        req.setValue(GrailsApi.version, forHTTPHeaderField: "Accept-Version") (1)
        let config = URLSessionConfiguration.default
        let session = URLSession(configuration: config, delegate: self, delegateQueue: OperationQueue.main)

        let task = session.dataTask(with: req as URLRequest) { (data, response, error) in
            if error != nil {
                if let delegate = self.delegate {
                    delegate.announcementFetchingFailed()
                }
                return
            }
            if let announcement = self.builder.announcementFromJSON(data) {
                if let delegate = self.delegate {
                    delegate.announcementFetched(announcement)
                }
            } else {
                if let delegate = self.delegate {
                    delegate.announcementFetchingFailed()
                }
            }

        }
        task.resume()

    }
}
我们向构建器添加了一个方法,以将网络数据转换为单个公告对象
    func announcementFromJSON(_ data: Data?) -> Announcement? {
        let json = try? JSONSerialization.jsonObject(with: data!, options: [])
        if let dict = json as? Dictionary<String, AnyObject> {
            if let title = dict["title"] as? String, let primaryKey = dict["id"]  as? Int {
                let announcement = Announcement(primaryKey: primaryKey, title: title)
                if let body = dict["body"]  as? String {
                    announcement.body = body
                }
                return announcement

            }
        }
        return nil
    }
以及一个委托协议来指示是否已获取公告
protocol AnnouncementFetcherDelegate: class {

    func announcementFetchingFailed()

    func announcementFetched(_ announcement: Announcement)
}
7 结论
借助于 Grails 的 API 版本控制的简单性,我们现在可以支持运行不同版本的两个 iOS 应用程序。
